The single-leg band-resisted pushup is not an ego lift. It is a stability demand that exposes weakness. Most guys can crank out 20 standard pushups without breaking a sweat. Add a band and remove one leg, and suddenly the floor feels like it is trying to throw you off. That is the point. This is a movement that builds anti-rotational core stability, explosive pressing strength, and shoulder resilience—all while humbling even the cockiest gym bro. This guide breaks down the setup, the mechanics, and who actually needs this in their rotation.
Health & Safety: For educational purposes only. Not FDA evaluated. These products and exercises carry inherent risks; results are not guaranteed and vary by individual. Always consult a professional before starting any new diet, supplement, or physical regimen.
Why Add a Band and Lift a Leg?
The standard pushup has a ceiling. Once you can do 20 clean reps, the stimulus for strength and muscle growth drops off. The single-leg band-resisted pushup solves two problems at once.
First, the band adds accommodating resistance. As you press up, the band stretches and increases tension. That means you work harder at the top of the movement—exactly where most pushups get easy. Second, lifting one leg removes a point of stability. Your core must now resist rotation and lateral flexion. The result is a movement that builds:
– Anti-rotational core strength
– Shoulder stability under dynamic load
– Upper body pressing power with variable resistance
– Neuromuscular coordination across the kinetic chain
For a deeper dive into band-resisted pressing mechanics, see our guide on band-resisted pushups. To understand how stability demands transfer to other lifts, read core strength with band chops.
Setup & Execution: Doing It Right
Set up is everything. Do it wrong, and you are just doing a messy pushup with a band that flops around.
What You Need
- A resistance band with moderate tension. Loop bands (often called pull-up assist bands) work best. Start with light tension and progress.
- A flat, stable surface. A puzzle exercise mat or yoga mat protects your hands and provides grip.
- Optional: push-up handles or parallettes if you have wrist issues.
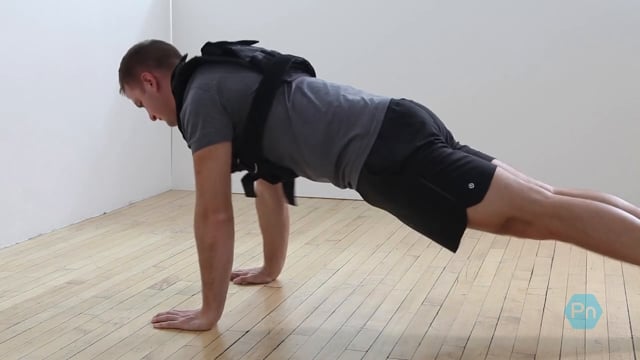
The Setup
- Loop the band across your upper back, just below the shoulder blades. The band should cross over your lats.
- Assume a standard pushup position with both hands on the floor, slightly wider than shoulder-width.
- Place the ends of the band under your palms. Your hands will pin the band to the floor.
- Lift one foot off the ground. Keep that leg extended or slightly bent—do not let it drop.
- Brace your core as if someone is about to punch you in the gut. Squeeze your glutes on the grounded leg.
The Movement
- Lower your chest toward the floor under control. Keep your elbows at roughly 45 degrees from your body—not flared.
- Pause briefly at the bottom. Do not bounce.
- Press back up explosively. As you press, the band tension increases.
- Keep your hips level throughout. Do not twist or dip.
- Complete all reps on one leg before switching.
For more on band placement and resistance, check band-resisted pushups. For pushup progressions from beginner to advanced, see push-up progression guide.
Biomechanics: Why This Works
The single-leg band-resisted pushup is a closed-chain kinetic chain challenge. Here is what happens under the hood.
| System | Demand | Training Benefit |
|---|---|---|
| Upper Body | Band increases tension at top range. You must press through variable resistance. | Develops explosive lockout strength. Overloads the triceps and anterior delts. |
| Core & Anti-Rotation | Single-leg stance removes one base of support. Body wants to twist toward the unsupported side. | Forces obliques and deep stabilizers to work overtime. Builds rotational control. |
| Scapular Stability | Band pulls shoulders forward at the top. You must actively retract and depress the scapulae. | Strengthens serratus anterior, rhomboids, and lower traps. Critical for shoulder health. |
| Lateral Line | Single-leg demands lateral stabilization from glute medius, adductors, and quadratus lumborum. | Builds resilience against side-to-side imbalances. Transfers to loaded carries and unilateral lifts. |
For more on how band resistance alters muscle activation, see band-resisted pull-up guide. To understand the role of anti-rotational work in injury prevention, read Pallof press core stability.
“The single-leg band-resisted pushup is a diagnostic tool disguised as an exercise. If you can’t control your hips and shoulders while one foot is in the air, you have a stability deficit that will eventually show up in your bench press or overhead work. Fix it here before it becomes an injury there.”
Charles Damiano, B.S. Clinical Nutrition
Who This Exercise Is For (And Who Should Skip It)
| For Whom? | Why It Works | Who Should Pass? | Why? |
|---|---|---|---|
| Intermediate-to-Advanced Lifters | Standard pushups have become too easy. Need a new stability and strength challenge. | Beginners | Master standard pushups first. Lack of core stability here leads to compensation and injury. |
| Athletes (Combat Sports, Wrestling, Rugby) | Develops anti-rotational strength and single-leg stability—direct transfer to sport. | Those with Shoulder Impingement | Band resistance can aggravate if scapular control is poor. Fix mechanics first. |
| Anyone Plateaued on Bench Press | Teaches explosive lockout and core bracing under variable load. See banded pushups. | Those with Active Wrist Injuries | High load on wrists in extended position. Use handles or skip. |
| Functional Fitness Enthusiasts | Challenges multiple planes and stability systems simultaneously. | Those with Unstable Knees | Single-leg stance on the floor can stress the knee if not controlled. |
Programming: How to Work It Into Your Training
This is not a main lift. It is an accessory with high carryover.
When to Use It
- As a warm-up finisher: 2 sets of 5-8 reps per leg before upper body work to activate core and shoulders.
- As an accessory movement: 3 sets of 8-12 reps per leg after your main pressing exercise.
- As a conditioning finisher: AMRAP sets or timed intervals to cap a session.
Volume Recommendations
| Experience Level | Sets per Leg | Reps | Frequency |
|---|---|---|---|
| Intermediate | 2-3 | 5-8 | 1-2x/week |
| Advanced | 3-4 | 8-12 | 2x/week |
| For Strength Focus | 3-5 | 3-5 | 1x/week (heavy band) |
Progression Strategy
- Start with no band: Master the single-leg pushup with perfect stability. No wobbling, no hip drop.
- Add light band: Focus on keeping hips level throughout the set.
- Increase band tension: Move to a heavier band when you can hit 10+ clean reps with good control.
- Add pause or tempo: 2-second hold at the bottom or 3-second eccentric increases time under tension.
For more on progression models, see progressive overload for arms and push-up progression guide.
Common Mistakes (And How to Fix Them)
- Hip Drop: The lifted leg side dips toward the floor. Fix: Squeeze the glute on the grounded side. Brace your obliques. Film yourself.
- Elbow Flare: Elbows go out to 90 degrees. Fix: Keep elbows at 45 degrees to protect shoulders. See perfect push-up form.
- Band Slipping: Band slides up your back or off your hands. Fix: Use a non-slip band. Loop it lower—across the mid-back, not the neck. Pin it firmly under your palms.
- Head Position: Dropping head or craning neck. Fix: Maintain a neutral spine. Look at a spot about a foot in front of your hands.
- Rushing the Eccentric: Dropping fast to the bottom. Fix: Control the descent. A 2-3 second eccentric increases tension and improves stability.
Safety Considerations
This exercise exposes weaknesses. Respect it.
- Wrists: If you have wrist pain, use push-up handles or parallettes. They shift the wrist into a neutral position.
- Shoulders: Do not attempt if you have active shoulder pathology. Start with light band and focus on scapular control. See correcting rounded shoulders.
- Lower Back: If you feel low back pain, your core is not braced. Reduce band tension or go back to two-legged band-resisted pushups until you can maintain a neutral spine.
- Knees: The supporting leg bears load in a single-leg stance. If you have knee issues, use a softer surface or skip until cleared.
For recovery from any strain, see our active recovery guide and massage gun for rotator cuff.
Single-Leg Band-Resisted Pushups: The Raw Truth
A: Start with a light band (often labeled 10-25 lbs of resistance). You should be able to complete 6-8 reps with good form. If you cannot keep your hips level, the band is too heavy or your stability is not ready. Drop to two-legged band-resisted pushups first.
A: Indirectly. It develops explosive lockout strength (band tension at the top) and forces core bracing under load. Both transfer to bench press. But it is not a replacement for heavy barbell work. Use it as an accessory.
A: No. This is a high-demand stability and strength movement. Your nervous system and connective tissue need recovery. Stick to 1-2 times per week with at least 48 hours between sessions.
A: Film yourself. Check for: hips level throughout, elbows at 45 degrees, no band slipping, neutral spine. If any of those break down, reduce band tension or reps.
Final Verdict: A Humble Exercise with Serious Returns
The single-leg band-resisted pushup is not flashy. But it is brutally effective. It forces you to address stability deficits that standard pushups and even bench press ignore. If you have been training for years but still feel unstable under heavy load, this movement will expose the weak links.
It is not for beginners. Master the standard pushup first. But once you are ready, this variation builds real-world pressing strength, bulletproofs your shoulders, and teaches your core to work under dynamic load.
Do this if: You have plateaued on pressing movements, want to build anti-rotational core strength, or need a challenging bodyweight accessory.
Skip this if: You are new to pushups, have unresolved shoulder or wrist issues, or cannot maintain a neutral spine with both feet on the ground.
For more challenging pushup variations, see our push-up progression guide. To build a complete home training arsenal, check best resistance bands guide and home gym equipment.
The Bottom Line: Stability Is Strength.
You can bench press a house, but if you cannot control your hips and shoulders with one foot off the ground, you have a hole in your foundation. The single-leg band-resisted pushup fills that hole. Use it, respect it, and watch your pressing stability transform.
The Exercise Lexicon: Pushup Variation Edition
- Accommodating Resistance
- A form of variable resistance where tension increases as the movement progresses. Bands and chains are common tools. This matches the natural strength curve of many lifts.
- Anti-Rotational Strength
- The ability to resist forces that want to twist the torso. Critical for stability in unilateral movements, loaded carries, and athletic performance.
- Closed-Chain Exercise
- A movement where the distal segment (hands or feet) is fixed. Pushups, squats, and pull-ups are closed-chain. These exercises generally offer greater joint stability and proprioceptive demand.
- Scapular Stability
- The ability to control the shoulder blades through full ranges of motion. Poor scapular stability leads to impingement, rotator cuff issues, and inefficient pressing mechanics.
- Stability Ball Pushup
- A pushup variation where hands are placed on a stability ball, increasing the demand on core and shoulder stabilizers. A progression beyond the single-leg version.