The Inverted Row is the definitive horizontal pull, engineering a thick upper back and bulletproof shoulders without the injury risk of heavy barbell rows.
This is the 2026 blueprint for aesthetic back development. If you’re grinding out half-rep pull-ups and wondering why your posture looks like a question mark, you’re losing the game. We are breaking down the mechanics that turn this bodyweight staple into a high-status muscle builder. Fix your pull. Build the V-taper.
Disclaimer: Consult a physician or qualified trainer before starting any new exercise. This guide focuses on performance and aesthetic optimization and is for educational purposes only.
Inverted Rows: The Horizontal Pulling Foundation
The Inverted Row is a bodyweight pulling exercise performed by hanging under a bar or rings and pulling your chest toward the handles. While most lifters obsess over the Chin-Up, the inverted row is actually more effective for developing the “thickness” of the mid-back and rhomboids. It’s a closed-kinetic chain movement that demands total core stability to maintain a rigid, plank-like position.
- Primary Focus: Upper Back (Lats, Rhomboids, Traps), Rear Delts, Biceps.
- Equipment Needed: Barbell in a rack, Smith Machine, or Suspension Trainer.
- Skill Level: Beginner to Advanced (depending on foot positioning).
- Key Purpose: Balance out pushing movements, improve posture, and build pulling strength.
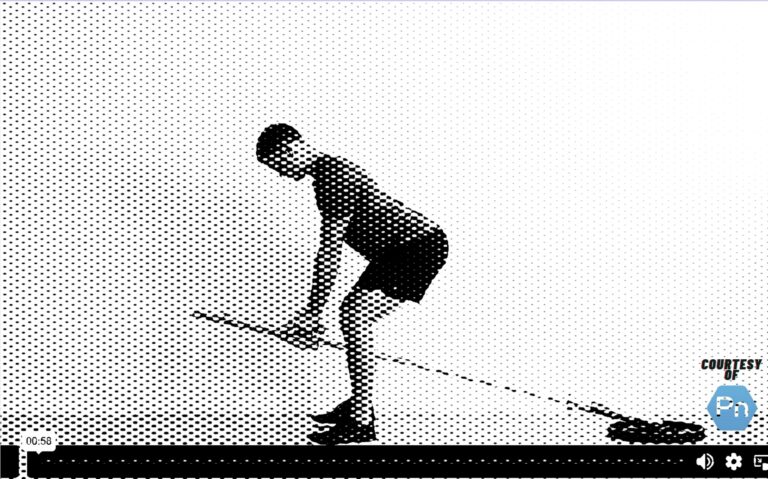
Inverted Row instructional video. Note the rigid body line and full scapular retraction.
Why Inverted Rows are Non-Negotiable for Aesthetics
If you want a back that actually looks impressive under a t-shirt, you need horizontal volume. The inverted row targets the scapular retractors better than almost any Barbell Deadlift or pull-up variation.
- Shoulder Health: It balances the internal rotation caused by heavy Barbell Bench Pressing.
- Scalable Intensity: You can adjust the difficulty instantly by moving your feet. No weight changes required.
- Grip Strength: Holding your body weight under a bar is a massive stimulus for Grip Strength and forearm development.
- Core Integration: To prevent your hips from sagging, your abs and glutes must fire as hard as they do in a Ab Wheel Rollout.
Step-by-Step Form: The 5-Point Checklist
- Setup: Set a bar at waist height. Hang underneath with an overhand grip, slightly wider than shoulders.
- The Line: Walk your feet forward until your body is in a straight line from head to heels. Squeeze your glutes and brace your core like a Single-Arm Plank.
- The Pull: Lead with your elbows. Pull your chest toward the bar. Do not lead with your chin.
- The Squeeze: At the top, retract your shoulder blades fully. Your chest should nearly touch the bar.
- The Descent: Lower yourself with control. Do not “drop” to the bottom. Keep the tension in your lats.
“The inverted row is often treated as a ‘beginner’ pull-up regression, which is a mistake. It is a fundamental foundational movement. If you can’t control the eccentric and fully retract the scapulae here, you’re just using momentum on your pull-ups. Own the horizontal plane first.”
— Eugene Thong, CSCS
3 Common Form Mistakes & How to Fix Them
Sloppy reps don’t build muscle; they just build bad habits.
1. The Hips Sag
The Mistake: Your glutes drop toward the floor, breaking the rigid line. The Fix: Squeeze your glutes like you’re trying to crack a walnut. If you still can’t hold it, regress your foot position or hit some Ab Wheel Isos to strengthen the anterior chain.
2. The “Chin-Reach”
The Mistake: Reaching with your chin to the bar instead of your chest. The Fix: Keep a neutral neck. Tuck your chin slightly as if holding an egg under it. Pull your shoulder blades back before the elbows move.
3. Short Reps
The Mistake: Failing to touch the chest to the bar or fully extend at the bottom. The Fix: Use a Band-Assisted Inverted Row to ensure you get the full range of motion until your strength catches up.
“From a nutritional perspective, high-volume pulling like this creates significant micro-trauma in the connective tissues. Ensure you are hitting your Collagen Peptides and Whey Protein to facilitate repair. Without the right biology, you’re just tearing down muscle without the rebuild.”
— Charles Damiano, B.S. Clinical Nutrition
Programming & Integration
Rows should be the cornerstone of your Back Workout.
- Mass Builder: 4 sets of 8-12 reps. 90s rest. Focus on a 2-second squeeze at the top.
- The Finisher: 2 sets to failure at the end of your upper body day. Pair with Beta-Alanine to buffer the acid and get those extra 5 reps.
- Pre-Workout Primer: Use 2 light sets of 10 to wake up the lats before a Bench Press session.
Variations to Scale Difficulty
- To Regress: Bend your knees and place your feet flat on the floor. This shortens the lever and makes the lift easier.
- To Progress: Elevate your feet on a bench or wear a weighted vest. This shifts the center of mass and mimics the load of a Single-Arm Dumbbell Row.
- Unilateral Challenge: Try a Single-Arm Standing Band Row to address side-to-side imbalances.
The Verdict
The Inverted Row is a non-negotiable tool for anyone serious about Building Muscle and maintaining joint integrity. It fixes your posture, thickens your back, and prepares you for the heaviest barbell movements. Stop neglecting the horizontal plane. Get under the bar.
Inverted Row FAQ
Are Inverted Rows better than Pull-Ups?
They aren’t “better,” they are different. Pull-ups are vertical; rows are horizontal. You need both for a complete compound movement profile.
Can I use rings instead of a bar?
Yes. Using rings allows for natural wrist rotation, which can be easier on the joints if you have a history of elbow or shoulder issues.
How heavy should I go?
With bodyweight movements, your “weight” is your body angle. If you can’t hit 10 perfect reps with feet straight, move your feet back until you can.